

Complementary signs
Complementary signs
Direction Signs
Complementary signs are intended to complete indications given by other signs.
|
O1 - Hectometric Road Marking Hectometric road marking: must include the indication of the hectometre, completed with the kilometre indication and, if applicable, the direction of the nearest SOS signal. |
|
|
O1a - Hectometric Road Marking Hectometric road marking: must include the indication of the hectometre, completed with the kilometre indication and, if applicable, the direction of the nearest SOS signal. |
|
O1b - Hectometric Road Marking Hectometric road marking: must include the indication of the hectometre, completed with the kilometre indication and, if applicable, the direction of the nearest SOS signal. |
|
O1c - Hectometric Road Marking Hectometric road marking: must include the indication of the hectometre, completed with the kilometre indication and, if applicable, the direction of the nearest SOS signal. |
|
O1d - Hectometric Road Marking Hectometric road marking: must include the indication of the hectometre, completed with the kilometre indication and, if applicable, the direction of the nearest SOS signal. |
|
O2a - Kilometric Road Marking Kilometric road marking: must include the indication of the hectometre, completed with the kilometre indication and, if applicable, the direction of the nearest SOS signal. |

|
O2b - Kilometric Road Marking Kilometric road marking: must include the indication of the hectometre, completed with the kilometre indication and, if applicable, the direction of the nearest SOS signal. |
|
O2c - Kilometric Road Marking Kilometric road marking: must include the indication of the hectometre, completed with the kilometre indication and, if applicable, the direction of the nearest SOS signal. |
|
O2d - Kilometric Road Marking Kilometric road marking: must include the indication of the hectometre, completed with the kilometre indication and, if applicable, the direction of the nearest SOS signal. |
|
O2e - Kilometric Road Marking Kilometric road marking: must include the indication of the hectometre, completed with the kilometre indication and, if applicable, the direction of the nearest SOS signal. |
|
O3a - Miriametric Road Marking Miriametric road marking: must include the indication of the hectometre, completed with the kilometre indication and, if applicable, the direction of the nearest SOS signal. |

|
O3b - Miriametric Road Marking Miriametric road marking: must include the indication of the hectometre, completed with the kilometre indication and, if applicable, the direction of the nearest SOS signal. |

|
O3c - Miriametric Road Marking Miriametric road marking: must include the indication of the hectometre, completed with the kilometre indication and, if applicable, the direction of the nearest SOS signal. |
|
O3d - Miriametric Road Marking Miriametric road marking: must include the indication of the hectometre, completed with the kilometre indication and, if applicable, the direction of the nearest SOS signal. |

|
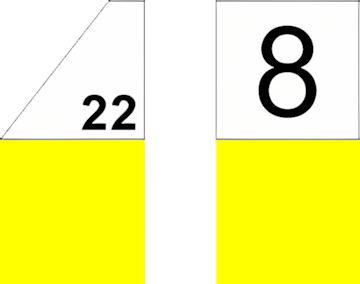
O4a - Exit Approach Sign Indication of the approach to an exit at a grade-separated intersection, given by the inclined bars, which represent the distances to the exit of 250m on motorways. |
|
O3e - Miriametric Road Marking Miriametric road marking: must include the indication of the hectometre, completed with the kilometre indication and, if applicable, the direction of the nearest SOS signal. |
|
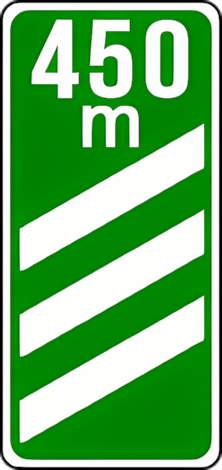
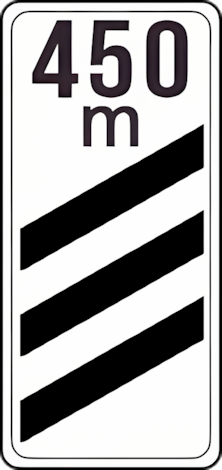
O4b - Exit Approach Sign Indication of the approach to an exit at a grade-separated intersection, given by the inclined bars, which represent the distances to the exit of 150m in other cases, with the numerical indication to be displayed at the top of the sign. |
|
O4c - Exit Approach Sign Indication of the approach to an exit at a grade-separated intersection, given by the inclined bars, which represent the distances to the exit of 150m in other cases, with the numerical indication to be displayed at the top of the sign. |

|
O5a - Directional Bay for Divergence Point Marking Indicates the point of divergence for an exit at a grade-separated intersection. |

|
O5b - Directional Bay for Divergence Point Marking Indicates the point of divergence for an exit at a grade-separated intersection. |

|
O6a - Directional Bay Indicates the development of a stretch in a curve, which can be used individually or in multiple successions. |

|
O6b - Directional Bay Indicates the development of a stretch in a curve, which can be used individually or in multiple successions. |

|
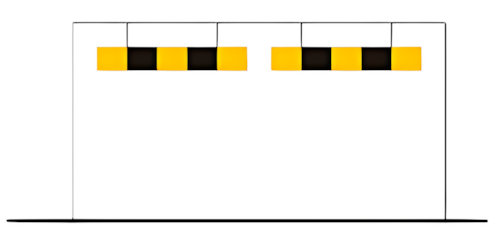
O7a - Position Marker Indicates the position and limits of existing obstacles on the road. |

|
O7b - Position Marker Indicates the position and limits of existing obstacles on the road. |
|
O8 - Gantry Indicates the limited free height. |